
ORaaS Orbit Determination Demo
Orbit determination is the core of a Flight Dynamic System. From a guessed initial orbit and a set of measurements, the algorithm determines the orbit of the observed object.
Our demo has reduced for you the number of parameters expected by the Orekit algorithms. You can even click on a button to populate the form, upload one of our sample measurements files and get the orbit determination result. Then play with the force model, feed the algorithm with more observations and improve the accuracy of your results.
-
Quick start
Go to the Demo, the Run Definition tab is active. You are ready for your first run: input the initial orbit, upload your measurements file and click on the Launch Orbit Determination button.
Even simpler, you can also populate the form with one of our examples (see below) to get a quicker insight on how it works.
Once your run is confirmed, ORaaS starts the computation on the server and returns its identifier, you are informed about its progress and finally the estimated orbit is displayed. See below for more details.
Click on the Runs tab at the top of the window. Your run appears in the list.
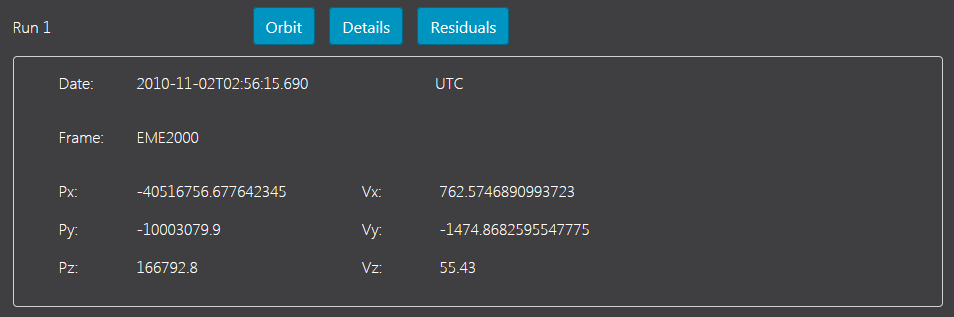
A sample result might look like this.
Once the run is completed, click on Residuals to check the results:
-
Run definition
The data to provide to the algorithm are grouped in forms that you can show or collapse by clicking on the title.
You have to input at least one file in Measurements Files and to define your Initial Orbit. Default values are provided for the Force Model.
To set the identifier of your run, uncheck the box at the bottom of the form.
-
Measurements Files
To determine the orbit of the observed object, you provide measurements to the algorithm. They can be either range or azimuth/elevation observations from a station, or the satellite position and velocity.
ORaaS expects measurements in one or several files formatted according to the TDM or OEM standards. To upload a file to the ORaaS server, pick it in your file system. The extension must be ".oem" or ".tdm". Click on the button Add a File to input extra files.
For further information about the measurements files formats, please look at this page of our documentation.
If a TDM file is provided, the input has to be completed by the location of the station(s) in the dedicated form Stations at the bottom.
-
Initial orbit
This parameter is also called "guessed orbit". It is the starting point for the algorithm iterations.
By default, the input for keplerian parameters is displayed. You can change the type of the orbit bulletin in the Type list box.
The Frame list box is populated with the name of the pseudo-inertial frames provided by Orekit.
The angle values are expected in degrees.
-
Force Model
By default, the propagation will be done with a default gravity field (Earth potential).
Expand the Force Model form to modify a subset of algorithms parameters:
You can check the boxes to add Moon and/or Sun third body attraction to the calculations.
To add the solar radiation pressure, you must set the value of the area exposed (in m2).
The same way, you will set the surface to add a drag to the model.
For more accurate results, you can override the default values for the coefficients and the mass of the satellite.
-
Stations
For the treatment of a TDM file, meta-data concerning the stations are expected. Our demo provides default values but you have to input the name and location of each station referenced in your TDM measurements files in the Stations form: Click on the button Add a Station, fields are added for the input of your station data.
The name of the station must be equal to its identifier in the file (value of PARTICIPANT_1).
The longitude and latitude are expected in degrees.
-
Examples
We have prepared two examples for you. The first use case is a real one, the TDM file comes from W3D satellite data. The second named "ORaaS" has been generated for our demo by the measurements generation functionality provided by Orekit.
To run orbit determination with these data, you have to download the required measurements files here. You will get a set of three files, one with measurements from W3D, the others for ORaaS sample generated from the same orbit bulletin.
- Click on W3B or ORaaS button, the Initial Orbit and Stations forms are populated and collapsed.
- Input the measurements file(s): choose the format and pick one file. For the second example, you can run orbit determination demo with either one or the two files provided.
- You can modify the default configuration of the algorithm in the Force Model form.
- Finally, click on the Launch Orbit Determination button to run the demo and get the results.
Please note that with the default force model configuration, the W3B orbit will not be calculated, the maximum number of iterations is reached and the algorithm stops.
-
Results
Once you have input the configuration of your run, click the Launch Orbit Determination button.
ORaaS checks your request and returns the run identifier which is displayed at the bottom of the window. Visual hints are added above as the computation progresses. At last, you get the estimated orbit.
One or several errors may be detected in your request, messages will be displayed in red. Please correct your input and send it again.
When the computation is launched on the server, three buttons are added beside the id of the run:
Click on the button Orbit to check the progress of the computation: as long as the run is not complete, you can get the current evaluation data. When the orbit determination results are available, the estimated orbit is displayed, or a message informs you that the maximum number of evaluations has been reached without success.
The button Details opens a tab with the data of your run. You can check your request and get the current report (see below) which is updated as the run progresses.
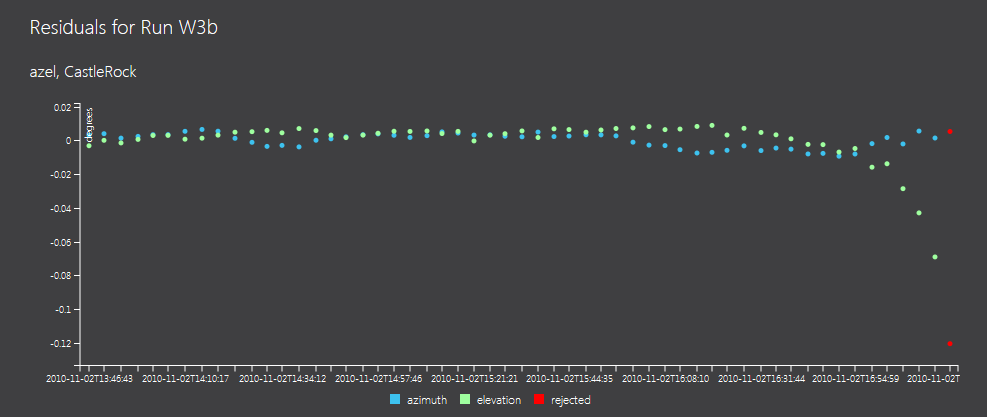
Once the run has succeeded, the Residuals button displays the residuals in charts (see below).
-
-
Runs
The Runs tab displays the list of your runs.
Once ORaaS has started your run, its id appears in the list and you can get information about it, even if the computation is not completed or has failed.
Please note that if you delete the cookie created by ORaaS for your identification, no run will be available on the server. The duration of this cookie is set to seven days.
For each run, you have three buttons:
- Click on Delete to remove your run data from the ORaaS server. When all your runs are deleted, your identification is deleted too.
- Details displays all information about the run, except the residuals.
- Residuals displays the residuals in charts (see below).
Please note that, currently, runs data may be erased from the ORaaS server for maintenance purpose.
-
Run details
In the list, you can click the Details button and display the information about a run.
First, the estimated orbit. This result is available only if the run is complete. If an error has occurred, the message is displayed.
Then, the request passed to the ORaaS server is displayed in three parts:
- the initial (or guessed) orbit,
- the configuration of the algorithm,
- the information about the measurement files.
At last, you can look at the report generated during the run. It is a list of messages about the parsing of the measurements files and the progress of the algorithm. This report is updated as iterations are performed by the orbit determination algorithm.
-
Residuals
When an estimated orbit is obtained and the propagation done, residuals can be computed for the measures treated by the algorithm. For each measure, the residual is the difference between the input value and the value computed by the propagation of the estimated orbit.
To display the residuals of a run, click on the Residuals button in the list of the Runs tab.
The residuals are displayed in charts. They are organized by station and type of measurements. The date of a measurement and its value are available in the tooltips. The rejected measurements are added in red.
To focus on a period, click in the chart, zoom with the mouse wheel and scroll by dragging the pointer.
-
About the algorithms
The core of orbit determination is the estimator. It is build with a Levenberg-Marquardt least squares solver. To observe the progress of the algorithm, you can click on the Orbit button in the New Run tab. The current results are displayed. If the convergence threshold(1.0e-3) cannot be reached, the algorithm stops after 20 iterations and a message is displayed.
The propagator is a numerical one with a 8(5,3) Dormand-Prince integrator. The force model is configured in the Force Model tab of our demo.
Number of parameters are not input in the tabs. Once you have launched a run, you can get their values in the Run Details tab where the complete request passed to the ORaaS service is displayed. The meaning of the parameters is given in the documentation.
-
ORaaS services
Our Orbit Determination Demo presents the set of orbit determination services published by ORaaS: creation and management of the runs. You can find details in our API documentation.